Setup Custom Domain to Blogger.
Most of new blogger use blogspot.com domain for own blog because blogspot platform is free and you donot need to pay money for it. However if your blog is being most popular day by day and you would like to see within the future is good and you want to make this hobby have my business additionally. Then you need to buy a domain name for you blogger. Today we did the same issue, how to get a domain and step how to add on blogger.
Setting up your Domain Name With Blogger?
1. How to Register a Domain Name?
Registering your domain name is the first step in establishing your online presence and reaching visitors. A domain name which you can use to refer to your website and your Business. There are many companies from whom you can buy domain names, usually for very reasonable yearly prices. You should search about it and find a list of good companies, you can use any registrar you like, but I prefer GODADY and in this tutorial I am going to show how you do this using godady, also GODADY permission to add coupon code and get full discount on domain register GoDaddy Cheap .COM Domain Coupon Code $1.99 "CODER199"
Okay after register your domain , Now we start how to put into your blogger.
Log into your blogger go to blogger. Select your blog go to Settings > Basic > , Under Publishing Choose "Add custom domain"
Now go to godady login and go to Domains and click Launch.
After Launch, select your Domain where you want to move to blogger click on Domain and go to Domain Dashboard.
Once you're done, switch back to Blogger (go back to your Settings > Basic) and enter your domain name once again within the custom domain field then click Save. once it's ready, the red error can not seem again.
That’s it! Your blogspot.com address will soon redirect to your new custom domain -- be patient, as it might take up to 24 hours for the redirect to start working. If you're still seeing an error after 24 hours, it means your settings weren't entered correctly and you should try the process a second time.
If you don't register you domain through GODADY then go to Google help page and view all settings..
If you need any help please contact us, and if this post help you then post comments. Thanks.....
Enter Domain name and click SAVE!
Note: * Blogger now requires that you make sure to add the "www" to the domain name you enter!
Note: * Blogger now requires that you make sure to add the "www" to the domain name you enter!
You will get a red error message. That's OK because they are giving you some important info to input. Copy all info and save to note pad, this info require to put into your domain register's locate DNS.
Now go to godady login and go to Domains and click Launch.
Now to to DNS Zone File and click Edit.
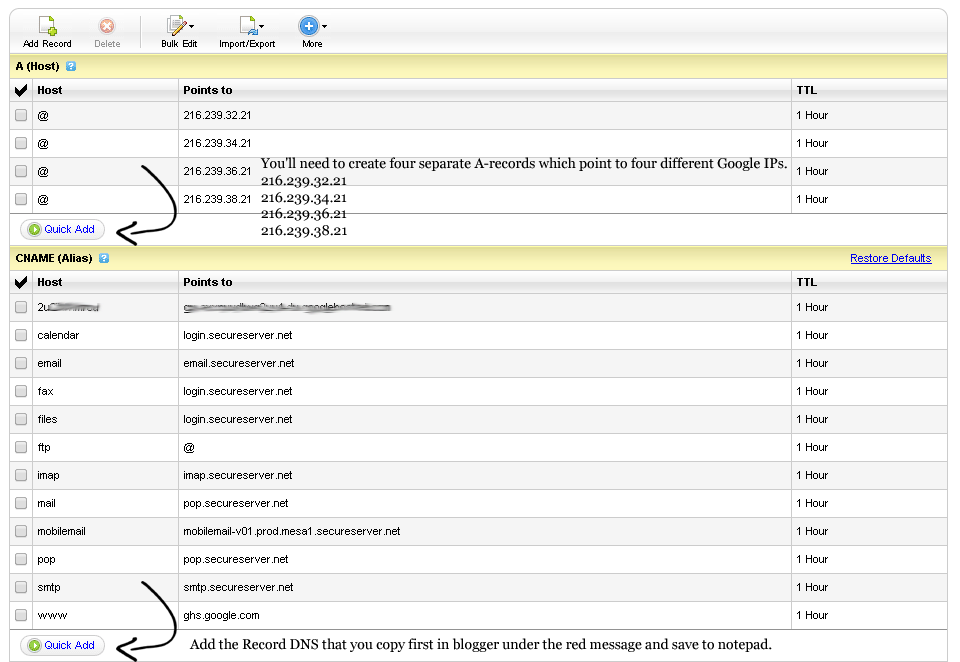
List the I.P. addresses shown below in the "A" section. You'll need to create four separate A-records which point to four different Google IPs.
216.239.32.21
216.239.34.21
216.239.36.21
216.239.38.21
Note: Remove other "A (Host)" IP address from DNS Zone File. Following example given below.
And Open Notepad File where you save DNS Record. No go to "CNAME (Alies)" and put the Record Label and Target Points to.
Note: Delete the others www host in CName (Alies)
Once you're done, switch back to Blogger (go back to your Settings > Basic) and enter your domain name once again within the custom domain field then click Save. once it's ready, the red error can not seem again.
That’s it! Your blogspot.com address will soon redirect to your new custom domain -- be patient, as it might take up to 24 hours for the redirect to start working. If you're still seeing an error after 24 hours, it means your settings weren't entered correctly and you should try the process a second time.
If you don't register you domain through GODADY then go to Google help page and view all settings..
If you need any help please contact us, and if this post help you then post comments. Thanks.....


Thanks Azeem for Writing this Superb Article that Helped me to Convert my Blog's Domain .Blogspot to .com (k)
ReplyDeleteRegards www.tech2webs.com
You welcome ankit sharma.
Deletehey Azeem, let u know what Benefits of Converting .blogspot domain to .com
Deletebrother, godady provides only domain name, I mean to say
ReplyDeleteI need existing blog, plus godady domain name setting to have my own custom domain name?
no hosting etc required?
:)
ReplyDelete